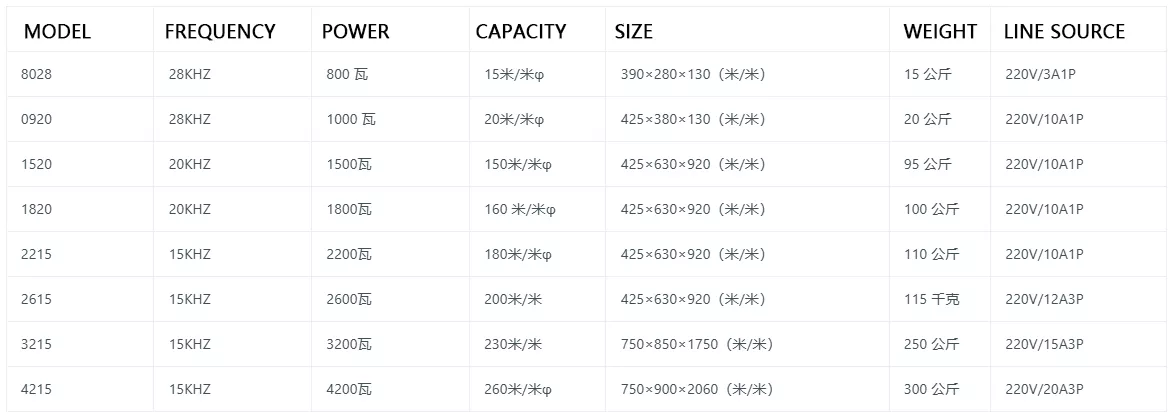
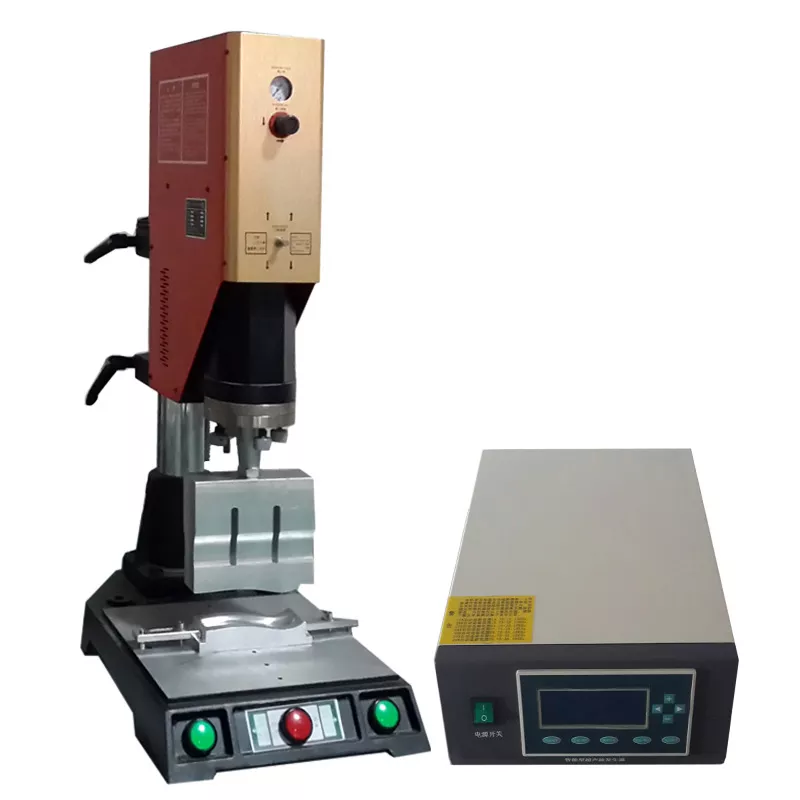
Automatic frequency tracking ultrasonic welding machine

One. Operation precautions
Before operating the machine, please read this user manual carefully.
2. Maintenance work must be carried out according to the repair instructions on weekdays to ensure the normal operation and service life of the machine.
3. Pay attention to keeping the machine bed clean and tidy at all times, and do not place tools and debris randomly to avoid affecting the normal operation of the machine.
4. Due to the presence of high-voltage wires inside the control box of this machine, please do not disassemble them at will to avoid accidents.
5. When using the foot switch, please be sure to leave the bottom mold with both hands first to avoid being crushed by the welding head.
6. When replacing the welding head, it is necessary to lock the welding head tightly to avoid adverse vibrations that may affect sound waves and cause combustion.
7. After replacing the welding head, it is necessary to adjust the sound wave to ensure the welding quality of the machine.
8. After production is completed, the power switch and gas source switch must be turned off to avoid accidents.
9. When operating, do not lift the vibration machine or the body cover to prevent high-pressure injury.
10. Ensure proper grounding to prevent static electricity accumulation.
11. When operating, place both hands outside the button and do not approach the welding head to prevent crushing.
12. When welding large workpieces or burying plants, earplugs or headphones should be worn; Acoustic materials can also be used around the body to reduce noise.
13. Some materials may produce toxic gases when heated, please pay attention to ventilation measures
2、 Description of body components
1. Air filter:
Connect a 5/16 inch air pressure pipe to a dry and clean air source to provide power for the machine's air supply. [Note]: When the inside is half full, press the bottom button upwards to remove water.
2. Body fixing handle:
Fix the body onto the pillar.
3. Slowly adjust the screw for upward movement:
Adjust the lifting and buffering speed of the welding head (about 10mm at the end of the lifting stroke) and rotate clockwise to enhance buffering; Rotate counterclockwise to reduce buffering.
4. Lowering buffer adjustment screw:
Adjust the buffering speed of the welding head descent (about 10mm at the end of the descent stroke) by rotating clockwise to enhance buffering and counterclockwise to reduce buffering.
5. Body shell:
Containing components of the air compressor system and control system; Such as solenoid valves, cylinders, control panels Wait.
6. Vibration tube:
To accommodate and fix the vibrator and transmission joint, connect the welding head driven by the cylinder, and when the fixing screw of the vibration tube is loose, the direction of the shaft and welding head can be rotated.
7. Stop nut:
When there is no working object on the base, prevent the welding head from contacting the base and causing damage.
8. Transmission Deputy:
Connect and fix the vibrator to the welding head, amplify the amplitude of the vibrator, and transmit it to the top of the welding head.
9. Ultrasonic welding head:
The ultrasonic welding head transfers the energy of ultrasonic waves to the workpiece. Usually, the vibration is tuned to 20KH (or 14.6KHZ) with a length of approximately 1/2 wavelength. The material is mostly titanium alloy, and aluminum titanium alloy has good acoustic properties and tensile strength. The sound characteristics of aluminum alloy are similar to those of titanium alloy. However, the tensile strength is only half of that of titanium alloy. Aluminum welding heads are prone to leaving oxides on the workpiece, which can be prevented by hard areas or using heat-resistant adhesive films.
[Note]: The welding head cannot be modified arbitrarily, otherwise it will change its resonant frequency, which can easily cause damage to the vibrator or electrical components.
10. Support pillar: located behind the base, used to support the body. If necessary, the screws behind the base can be loosened to rotate the direction of the body to accommodate special working objects.
11. Base:
As a work plane, there are 12 screw holes (M8P1.25) to secure the work base.
12. Pressure gauge:
Display pressure gauge 1 to show the pressure applied by the welding head to the workpiece. Display the relative relationship between gauge pressure and actual pressure.
13. Voltage regulator:
Adjust the air source pressure entering the cylinder.
【 Attention 】: Please remove the red collar before adjusting, and then press it in to calm down.
14. Delay timer:
Set the time from when the vibrator starts to descend to when the ultrasonic waves start to emit. Usually, the descent speed and buffering are matched with the moment of the first contact operation of the welding head, and then the ultrasound starts emitting.
15. Welding timer:
The time for emitting ultrasonic waves.
16. Curing timer:
The time between the cessation of ultrasound and the start of oscillator rise. During this period, plastic often solidifies from a molten state and still requires pressure to be applied to the workpiece.
17. Select switch:
a. Manual operation:
When both hands enter and press the pressure buttons of the two operating hands, the welding head will descend with the vibrating cylinder and remain in place until the emergency up button descends, and the welding head will ascend with the vibrating cylinder.
Bay. Automatic timing operation:
When both hands are pressed simultaneously
Previous: 1532PLC all-in-one machine
Next: Rotary welding machine


